Yes, overhead storage works when the ceiling structure, fasteners, clearance, and load all match. Choose a 4x8 rack for a two-car bay, a 45x45-inch deck for a compact garage, a pulley for bikes or kayaks, and hooks for awkward gear. Skip overhead storage for liquids, flammables, valuables, and fragile items. If you’re unsure about the framing, stop before drilling and ask a qualified professional.
Why Overhead Storage Is Different from Wall or Floor Storage
The ceiling frees parking and work surfaces but raises the consequences of a mistake. A floor shelf usually drops a box a few inches; a failed ceiling rack can release it from several feet up. That changes how you choose hardware, divide weight, and plan access.
Overhead storage suits items used a few times a year: holiday bins, camping gear, spare luggage, and kayaks. Daily-use tools belong on a wall or floor where you can reach them without a ladder. The garage hub shows how this overhead zone fits into the broader room plan, while the 4-type garage storage system compares ceiling, wall, rail, and floor options.
Before shopping, clear the bay and measure three things: joist spacing, ceiling height, and the lowest point of the open garage-door track. Then purge anything you no longer use with the garage declutter checklist.
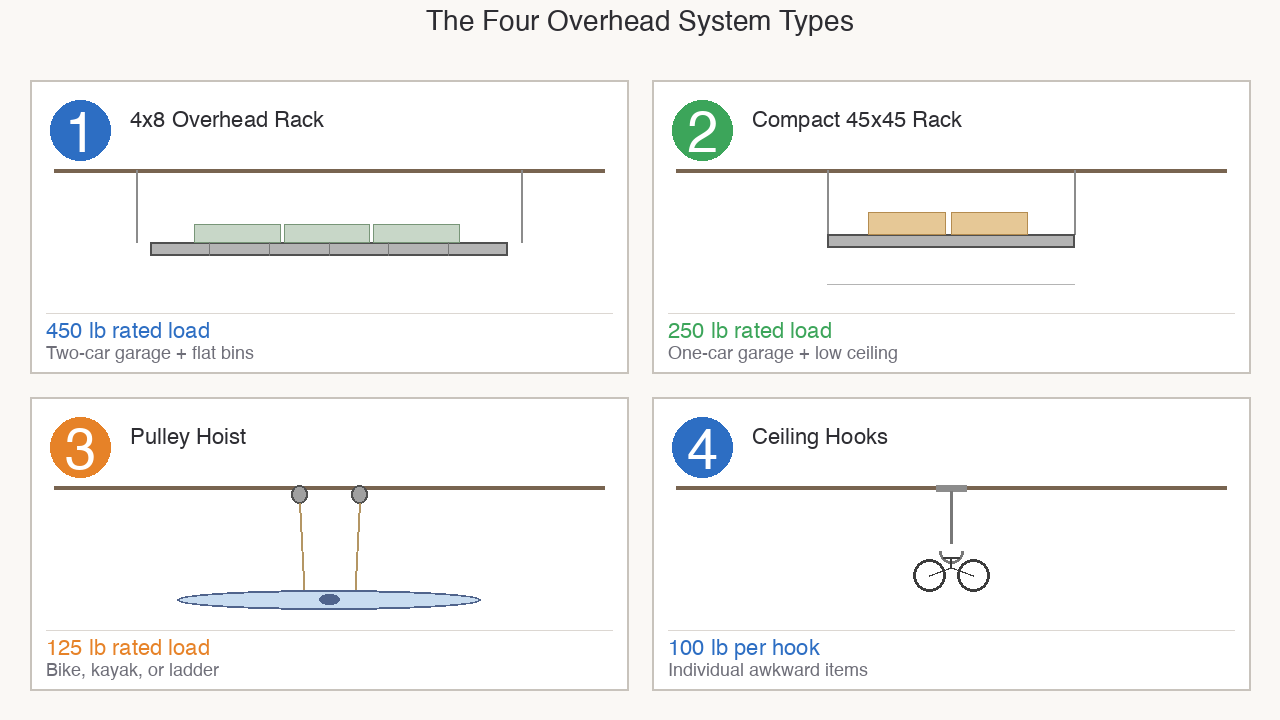
The Four Overhead System Types
Each system solves a different shape and access problem. Don’t choose by the product photo alone; choose by the load and the movement you’ll repeat.
The Four-System Comparison at a Glance
4x8 Overhead Racks: The Main Storage Platform
A large rack gives you a flat deck for lidded bins. The FLEXIMOUNTS 4x8 overhead rack is listed at $145.99 with a 4x8-foot deck and a 450-pound rated load. Keep real cargo well below that number, spread it across the deck, and leave room to inspect the brackets. A 4x8 rack generally needs a taller ceiling and careful clearance around the door tracks.
Compact Racks: For One-Car Garages and Low Ceilings
A 45x45-inch deck uses less overhead width and can fit between tracks in a one-car garage. The HyLoft 45x45 overhead rack is listed at $101.14 and rated for 250 pounds. Measure your door’s open arc before ordering.
Pulley Hoists: For Bikes, Kayaks, and Ladders
A pulley keeps long or irregular gear off the floor without needing a wide deck. The RAD Sportz kayak storage hoist is listed at $20.34 and rated for 125 pounds. For two separate loads, the RAD Sportz two-pack is listed at $39.66. Never stand beneath a suspended load while raising or lowering it.
Ceiling Hooks: For Awkward Individual Items
Hooks work for a ladder, bike, hose, or chair that doesn’t sit neatly on a deck. The GURADESIGN eight-pack bike hooks is listed at $6.99, with a stated 100-pound load per hook. The Etoolia six-pack utility hooks is also listed at $6.99 and has a shorter reach. Use one hook per designed attachment point.
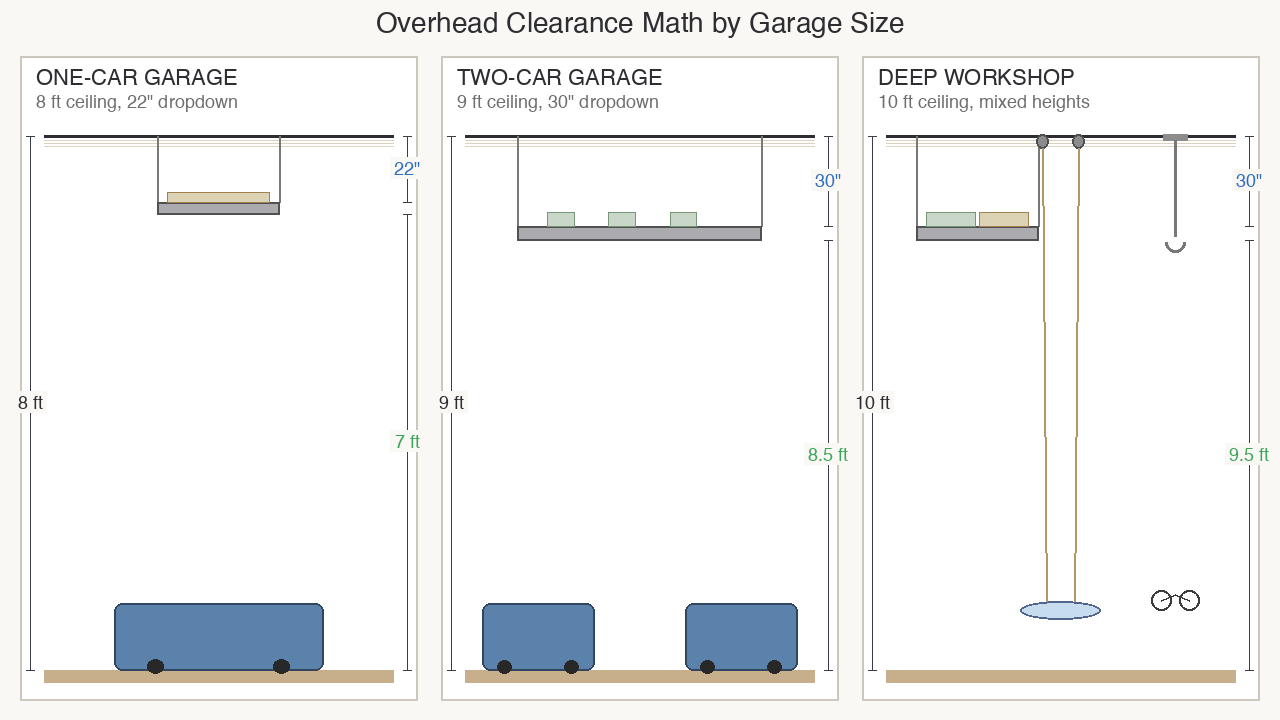
Layout by Garage Size
The right layout starts with clearance, not capacity. Keep the vehicle path, door tracks, lights, and walking route clear.
One-Car Garage: 12 by 22 Feet
For a typical 12-by-22-foot bay, center one compact deck away from the door’s moving hardware. A HyLoft 45x45 rack can hold seasonal bins; a RAD Sportz hoist can handle one bike along the side. Leave enough headroom to walk beneath the lowest part of the load.
Two-Car Garage: 22 by 22 Feet
Use one 4x8 deck per bay only after mapping the open door tracks and joist directions. A FLEXIMOUNTS 4x8 rack can serve one parking side, while a RAD Sportz two-pack keeps bikes or kayaks on the other. Don’t let a deck project into a door’s travel path.
Deep Workshop: 24 by 24 Feet or Larger
we see a deep workshop benefit from mixed heights. Put infrequently used bins on a rack at the rear, hang a kayak or ladder with a hoist near a clear wall, and reserve lower areas for tools. Etoolia utility hooks can hold hoses and chairs. Keep every suspended item outside the workbench’s fall zone.
The Clearance Diagram
Constraint Guide: Choose by the Problem You Have
The same rack won’t suit every ceiling or household. Use these if-then choices before buying.
If You Rent
We ask renters to get permission before drilling. If drilling isn’t allowed, don’t install a lag-mounted rack. Use a floor solution for heavy items and ask about a removable hook system for light gear. A Sakugi five-tier floor shelf keeps paint and tool cases grounded, while Etoolia utility hooks are an option only with written landlord approval.
If Your Budget Is Under $50
We recommend a low-cost first step: start with one hoist or a small hook set rather than a rack. The RAD Sportz single hoist handles a bike or kayak, and the GURADESIGN eight-pack covers ladders and smaller gear. Keep the load conservative until you know how the ceiling behaves.
If Your Ceiling Is Eight Feet
If clearance is tight, choose the HyLoft compact rack and measure the open door first. Pair it with the RAD Sportz hoist for an item you can raise only as high as needed.
If You Store Liquids or Heavy Tools
We keep liquids and dense tools on the floor. If an item can leak, tip, or exceed a cautious overhead load, keep it on the floor. The Sakugi floor shelf gives paint and fertilizer a stable home, while the FLEXIMOUNTS 4x8 rack stays reserved for light, sealed seasonal bins.
If You Need Daily Access
We treat daily access as a signal to use another zone. If you reach an item every day, overhead is the wrong zone. Use a wall-mounted rail storage system for hand tools and Sakugi floor shelving for heavier gear. A rack is for reclaiming space, not making routine work harder.

Step-by-Step Method: Install and Load an Overhead System
Plan the load on paper before you lift anything. Have another adult present for assembly and use a stable ladder; never improvise a support from a car or rolling chair.
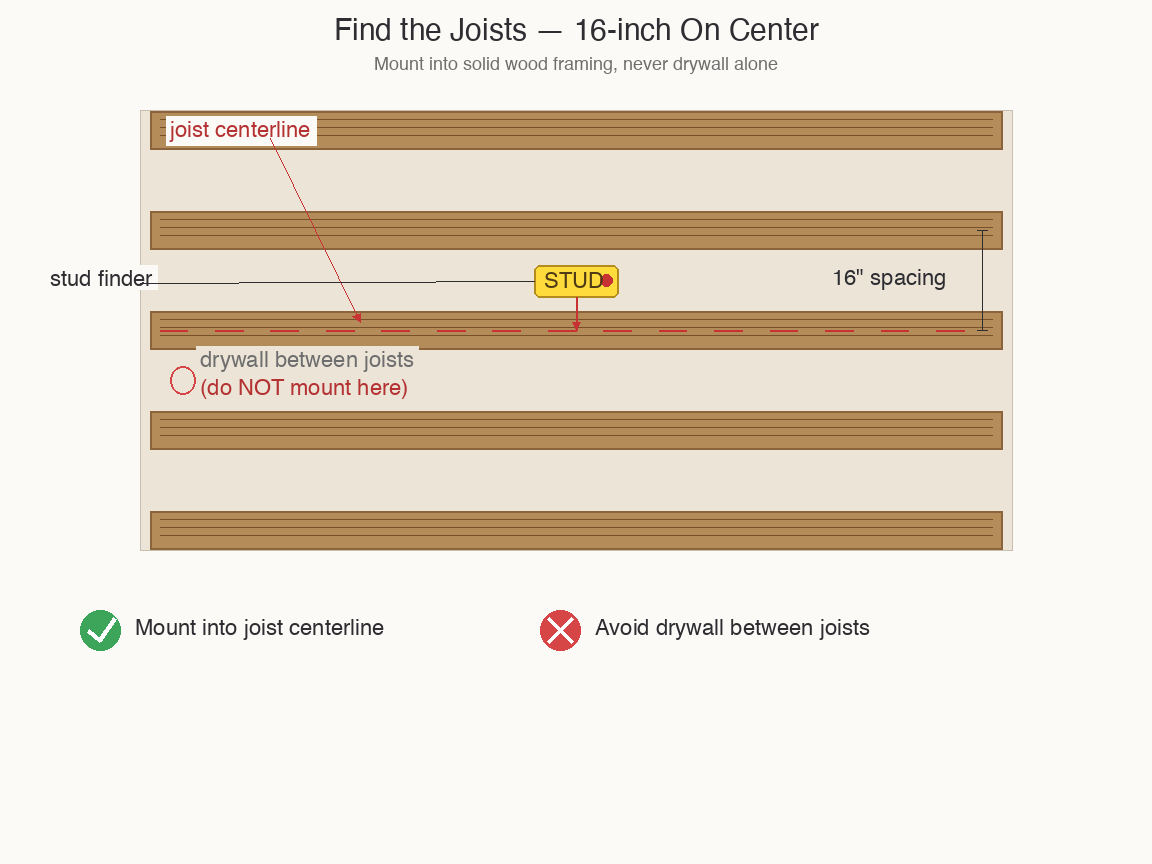
Step 1: Find the Joists
Use a stud finder, then confirm each centerline with a small pilot hole in an inconspicuous spot. Wood joists commonly run at 16 or 24 inches on center. Mark the full bracket pattern and make sure the rack’s mounting holes land in sound framing, not just drywall. Concrete ceilings need a different anchor system and should be assessed against the manufacturer’s instructions.
Step 2: Measure Clearance
Open the garage door fully and measure from the ceiling to the highest point of the track. Add the rack’s dropdown, the bin height, and a walking clearance buffer. Mark the lowest edge with painter’s tape. If a car, door, light, or person intersects that line, change the location or choose a lower-profile system.
Step 3: Set a Conservative Load
Weigh the bins and gear, then add a margin for movement while loading. Keep real cargo at or below half the rack’s stated capacity unless an engineer or the manufacturer’s installation guidance says otherwise. Heavy items belong low; light seasonal textiles and empty luggage can go overhead. A floor shelf such as the Sakugi five-tier unit is better for dense paint cans or tool cases.
Step 4: Assemble and Fasten
Follow the rack or hoist manual, using the specified lag screws, washers, and pilot-hole size. Tighten hardware evenly; don’t crush drywall or substitute toggle bolts. For hooks, align the screw with a joist and test one unloaded hook before adding gear. If the bracket pattern cannot meet framing, stop and choose another location.
Step 5: Load, Label, and Test
Load the lightest bins first and keep the weight spread across the deck. Raise a hoist slowly, checking that straps stay seated and the load doesn’t swing. Add a clear label to every bin and write the access season on the front. The storage bins decision guide helps match lidded containers to dusty garage conditions.
Common Mistakes
- Fastening to Drywall Instead of Framing
Drywall isn’t structural. Anchors may hold an empty bracket but can pull free when a rack is loaded or shaken during a lift. Find the joist center, pre-drill correctly, and stop if your planned position has no suitable framing.
- Treating the Product Rating as Your Working Load
A published rating assumes a distributed, static load and correct installation. It doesn’t account for a bin dropped onto the deck or a person tugging a stuck strap. Keep a 50% working-load ceiling and re-check the fasteners during each audit.
- Blocking the Garage Door or Light
A rack that clears a closed door can still collide with the track or opener when the door moves. Open and close the door before loading. If the deck blocks a fixture, move the fixture or choose a different bay; don’t accept a dark work area.
- Putting Liquids and Flammables Above Your Head
A sealed container can leak, and a falling fuel or solvent container creates a much worse problem. Store these items in a stable cabinet or on a floor shelf. The garage cabinet storage guide covers enclosed options.
- Forgetting About Access
Seasonal storage still needs a safe retrieval plan. Leave a ladder position clear, keep labels facing the aisle, and don’t stack loose boxes on a rack deck. If you need daily access, move those items to garage floor shelving.
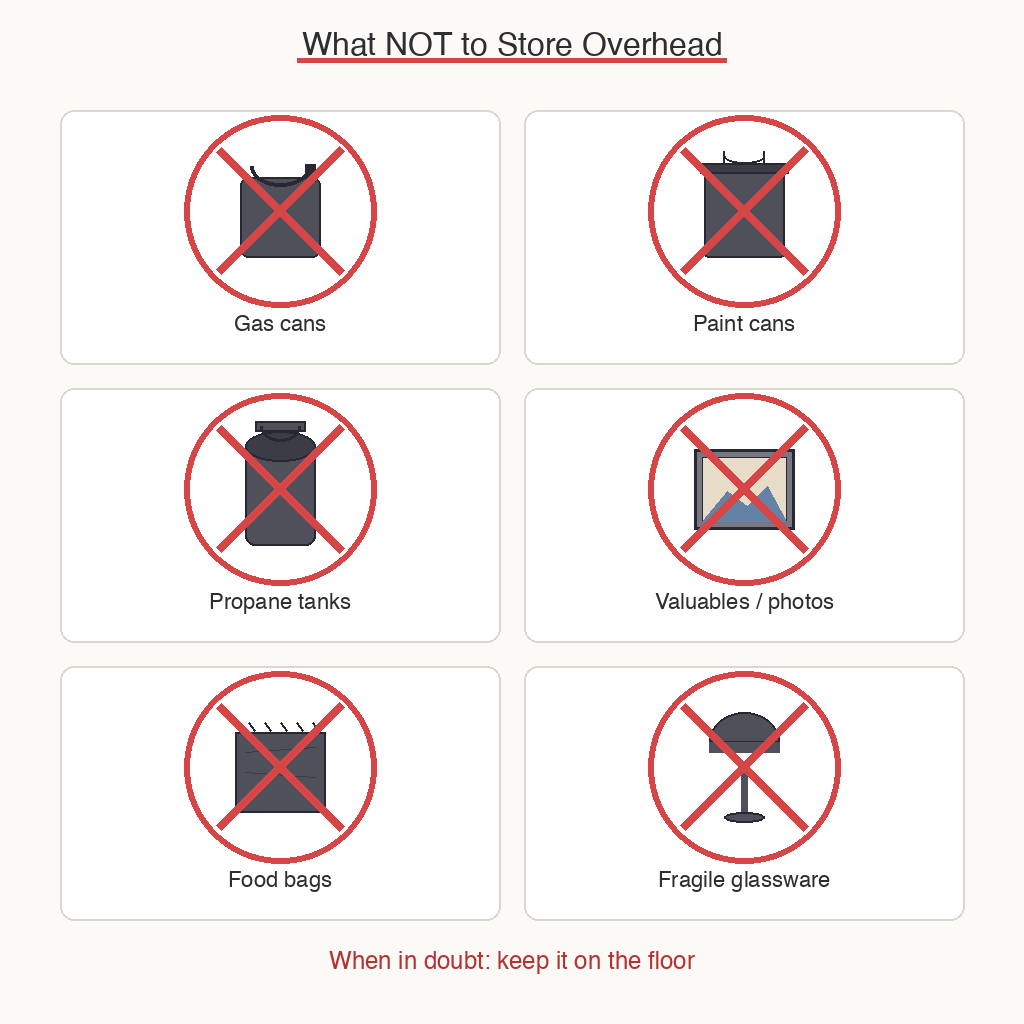
What NOT to Store Overhead
Keep the overhead zone for light, dry, sealed, and infrequently used items. Don’t store gas cans, propane cylinders, paint, cleaners, solvents, fireworks, food, pet supplies, photographs, important documents, glass, or anything that can spoil or spill. Don’t put batteries or electronics there if summer heat regularly exceeds their storage range.
The Items-That-Stay-Low Checklist
When an item fails one of those tests, use a cabinet or the floor. The garage cabinet storage guide is a better route for liquids and valuables; garage floor shelving suits heavy tools and dense supplies.

Maintenance: A Twice-Yearly Overhead Safety Audit
A short spring and fall check catches loose hardware before a failure. You don’t need to unload a sound rack every time, but you do need to inspect it.
Spring Audit: Re-Tighten After Winter
Snug each accessible screw with the correct socket. Look for a deck sag greater than 1/4 inch, rust on brackets, cracked wood around holes, and straps with frayed edges. If a fastener spins without tightening, unload the area and relocate the bracket into fresh framing.
Fall Audit: Test Before Holiday Loading
Before adding seasonal bins, check the open-door clearance and inspect every container lid. Load a small amount first, then watch for movement. Don’t test a rack by standing beneath a suspended load. Replace any cracked bin instead of taping it shut.
Reset Labels and Zones
Re-label faded tags with a durable label and tag system. The 5S method gives you a simple Sort, Set, Shine, Standardize, Sustain reset; the zone-cleaning method keeps the area usable between audits.
Related Garage Guides
Overhead storage is one part of a room-wide plan. Start with the garage organization hub, then use the 4-type garage storage system to choose between ceiling, wall, floor, and rail storage. For a tight bay, read the small garage organization guide. Pair a ceiling rack with the 5-zone garage layout system, and use the garage declutter checklist before buying more containers.
Key Takeaways
- Match the rack or hoist to ceiling height, joist spacing, and the open garage-door path.
- Fasten into structural framing, never drywall alone.
- Treat half the published load as a practical ceiling unless professional guidance says otherwise.
- Keep liquids, flammables, valuables, food, and fragile items on the floor or in cabinets.
- Use racks for flat bins, hoists for long gear, and hooks for individual awkward items.
- Inspect hardware, clearance, straps, and labels twice a year.
Sources and Verification
Product titles and prices in this article come from the Amazon Creators API response supplied for this assignment; prices can change. Editorial recommendations reflect the listed dimensions, capacity, and intended use. Confirm the current installation manual, joist condition, and load rating before fastening anything overhead.